PADI IDC DIVE THEORY
PADI dive theory – Skills and Environment, is one of 5 subjects that will be tested on the PADI Instructor exam.
We have made these materials available to help you to prepare for your PADI Instructor exam or PADI Divemaster exam. If you choose to do your PADI Divemaster course or PADI IDC with Asia Scuba Instructors you will have access to many more materials in our ‘online classroom’.
Skills & Environment
Currents
Currents that affect divers are most commonly caused by the Earth’s rotation, waves, tides and wind.
Major ocean currents – The world’s oceans cover approximately 71 percent of the earth’s surface. The major ocean currents are caused by wind and the rotation of the earth. This is known as the Coriolis Effect.
In the northern hemisphere the major ocean currents move clockwise.
In the southern hemisphere the major ocean currents move anti-clockwise.

Longshore currents are created by waves approaching the shore at an angle and pushing water along the coast.
Tides are caused by the gravitational interaction of the earth, moon and sun.
Tidal currents are currents caused as the daily tides rise and fall. Tidal currents alternate direction and vary in speed, slowing to almost zero as the tides reach their highest and lowest points. Tidal currents are most common where there’s a pronounced variation in tidal heights and a relatively contained area like a bay with an opening to the sea to create a strong water flow.
Offshore currents are large-scale permanent currents caused by the earth’s rotation, prevailing winds, and the heating and cooling of water. Offshore currents can cause an upwelling. This occurs when surface water moves offshore and is replaced by water, rising from the adjacent depths.
River currents are caused by water flowing downhill to the sea.
A rip current can form because wind and breaking waves push surface water towards the land, and this causes a slight rise in the water level along the shore. This excess water will tend to flow back to the open water via the route of least resistance.
Rip currents can be very strong. When caught in a rip current you should avoid swimming against the current. Instead, you should swim sideways, parallel to the shore.

Handsignals


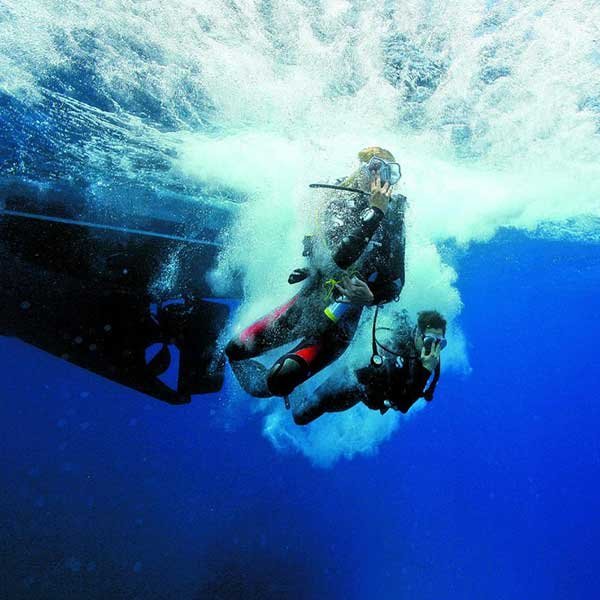
CESA
The controlled emergency swimming ascent should be done with all equipment in place – the diver should keep his weight belt on and his regulator in his mouth. Retaining the regulator in the mouth is important because it helps to keep the airways open and the diver may get a last breath from the tank as the surrounding pressure becomes lower when approaching the surface.
The diver should kick to start the ascend and then swim slowly at a rate not to exceed 18m/min. He should have his right hand above his head and hold the low-pressure inflator up with his left hand. He should look up and make a continuous ‘aaah’ sound, exhaling through the entire ascent.
Upon reaching the surface, the diver should establish positive buoyancy by either dropping his weights or orally inflating his BCD. The correct procedure to perform an emergency weight drop is to use the quick release of the weight system and pull the weights clear from your body.
Buoyancy check
When diving in a new environment, with new equipment or after a period of inactivity, it is advised to perform a buoyancy check at the surface before starting the dive. While resting vertically in the water and with all equipment in place, without finning or sculling and while holding a normal breath, the diver should float at eye level. If not, the weight system can be adjusted.
As a final check, the diver should breath out and sink slowly.
DSMB
Sending up a DSMB (delayed surface marker buoy) before ascending to the surface is very important to show your position and to warn boat traffic. After inflating the buoy, hold on to the reel while keeping tension on it. Hold the reel in your hand and never clip it to your BCD or other equipment.

Drift diving procedures
When diving in a mild current, the general advice is to start the dive against the current and return to the entry point with the current.
Water movement caused by tides can affect the visibility, depending on the bottom composition. The best time to dive is generally during slack high tide.
Currents are generally stronger near the surface so when diving against the current it is advised to stay close to the bottom.
Near underwater pinnacles and steep drop-offs, downcurrents can occur. Most likely, downcurrents are caused when opposing horizontal currents meet and water is pushed down. It usually follows the local topography, such as down a wall.
Downcurrents are more likely to occur in areas that are known for having strong currents in general.
When caught in a downcurrent the advice is to stay calm and try to swim away from the wall.
When diving a relatively small dive site in a strong current it can be useful to make a ‘negative entry’. The diver completely deflates his BCD and descends immediately after entering the water. Be aware that small equipment problems like defogging your mask should be solved before entering the water.
When drift diving in a group sometimes a float (with line and reel) is used to keep the group together. The line handler descends first and the group stays behind the line handler during the dive. The line handler should never clip the line to his BCD or other equipment.
Search and recovery procedures
When searching for a medium to large size object the preferred search pattern is an expanding square pattern. To navigate an expanding square you count your kick cycles and make 90 degree turns, adding one or more kick cycles after every turn. The number of kick cycles to use depends on the visibility, bottom topography and the size of the object. The main advantages of an expanding square pattern are that there is no special equipment needed and that eventually the entire search area is covered.
If the search area is restricted, for instance by a reef or beach, it is possible to use a U-shaped search pattern. Again the number of kick cycles to use depends on the visibility, bottom composition and the size of the object. To swim a U-pattern, make two 90 degree turns to the left, followed by two 90 degree turns to the right and so on.
A circular search pattern can be used to search for small objects. One diver positions himself at the center, holding a reel. Another diver holds the end of the line and swims in a circle. After a full circle, the center diver feeds more line. The main disadvantages are that the search area is limited in size and the bottom topography (obstructions) can cause difficulties. Alternatively, it is possible to use a semi-circular pattern.
If the search area has many obstructions on the bottom it is possible to use a jackstay pattern. Start by establishing one edge of the search area as a baseline. Stretch a rope perpendicular to the baseline and use this as a search reference. This rope is moved along the baseline until the object is found or the dive limit is reached.
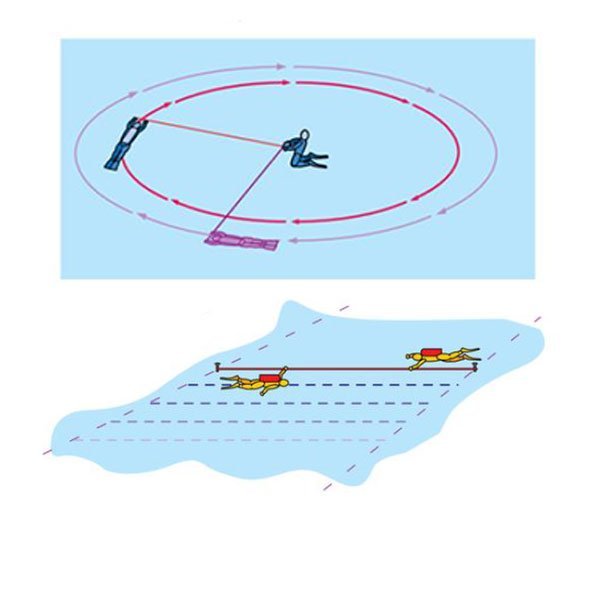
Circular pattern and jackstay pattern
Recreational search and recovery divers are trained to use a lift bag to lift objects to a maximum of about 45 Kg. Never use your BCD for lifting objects that weigh more than about 4 Kg.
When using a lift bag it should be filled with enough air to make it neutrally buoyant. Slowly bring the object and lift bag to the surface, staying at the side of the lift bag. Avoid being under the object.
Night diving procedures
On a night dive, every diver should carry a primary light. It is recommended that every diver also carries a backup light. When the primary light fails, switch to your backup light first and then signal your buddy. Use the backup light to safely end the dive. Do not simply continue diving with it.
Making a circular motion with your light signals “OK”. Waving your light slowly up and down is an attention signal but a rapid side to side light wave is considered an emergency attention signal.
Boat diving procedures
Terminology:
Bow – front of the boat
Stern – back of the boat
Port – when facing forward, the boat’s left
Starboard – when facing forward, the boat’s right
Windward – towards the wind
Leeward – away from the wind
Head – toilet
Galley – kitchen
Divers that are prone to seasickness can take seasickness medication before boarding. This medication can be any of several drugs, sold under various brand names. Some seasickness medication may cause drowsiness.
If you feel seasick, stay outside in the fresh air. Stay near the stern, in the middle of the boat, that is most stable or near the leeward rail.
When diving from a boat, several lines may be used to make the beginning and the end the dive easier. The mooring line or anchor line is the line that holds the boat in place. This line can be used to descend or ascend. In rough seas, the mooring line will jerk up and down and a separate descend line can be used.
A current line or trail line can be trailed behind the boat to assist exiting and entering the water in strong currents. A tag line or swim line runs from the mooring line to the stern of the boat and can be used by divers to pull themselves from the entry area to the mooring line or descend line.

Project AWARE
Project AWARE is a nonprofit organization with strong links to PADI (it started as a project group within PADI). It is powered by divers and empowering divers for the purpose of marine conservation. AWARE stands for Aquatic World Awareness Responsibility and Education. More about project AWARE can be found on www.projectaware.org.

Project AWARE 10 tips for divers
1. Be a Buoyancy Expert
Underwater plants and animals are more fragile than they appear. The swipe of a fin, bump of your camera or even a touch can destroy decades of coral growth, damage a plant or harm an animal. Streamline your scuba and photo gear, keep your dive skills sharp, perfect your underwater photo techniques and continue your dive training to fine-tune your skills. Always be aware of your body, dive gear and photo equipment to avoid contact with the natural environment.
2. Be a Role Model
New scuba divers are being trained and certified every day. Regardless of your experience level, be sure to set a good example for others when interacting with the environment – while underwater and on land.
3. Take Only Photos – Leave Only Bubbles
Nearly everything natural found underwater is alive or will be used by a living creature. If you take a coral, shell or animal, you can disturb the delicate balance and add to the depletion of dive sites for future generations.
4. Protect Underwater Life
Choose not to touch, feed, handle, chase or ride anything underwater. Your actions may stress the animal, interrupt feeding and mating behavior or provoke aggressive behavior. Understand and respect underwater life and follow all local laws and regulations.
5. Become a Debris Activist
An astonishing amount of waste makes its way underwater, reaching even the most remote ocean areas. Once there, it kills wildlife, destroys habitats and threatens our health and economy. Don’t let your dives go to waste. Remove and report what doesn’t belong underwater every time you dive. Make a conscious effort to buy green, buy local and, when possible, buy less.
6. Make Responsible Seafood Choices
Overfishing leads to species declines while harmful fishing practices damage and pollute underwater ecosystems. You play a critical role as a consumer. If seafood is part of your meal selection, ensure you’re choosing sustainably sourced species and encourage others, including restaurants and shop owners, to do the same.
7. Take Action
Scuba divers are some of the strongest ocean advocates on the planet. Now, more than ever, divers like you are taking a stand. Speak out for conservation, share your underwater images, report environmental damage to authorities and campaign for change.
8. Be an Eco-tourist
Make informed decisions when choosing and visiting a destination. Choose facilities dedicated to responsible social and environmental business practices that include water conservation, energy reduction, proper waste disposal, use of mooring buoys and respect for local cultures, laws and regulations.
9. Shrink Your Carbon Footprint
Global warming and ocean acidification are putting your favorite animals and the whole ocean planet at risk. Do your part by understanding and reducing your carbon footprint and look for ways to offset what you can’t reduce.
10. Give Back
Ocean protection depends on all of our actions, large and small. Investing in the ocean protects our planet and lets the dive adventure live on. Donate or fundraise for ocean protection to fuel the grassroots action and policy change necessary to ensure a clean, healthy ocean planet.
First Aid
When finding an unconscious diver in the water the first priority is to establish positive buoyancy. Then call for help and check for breathing. Start with 2 slow breaths and then give one breath every 5 seconds. Tow the victim to shore or boat while removing equipment. The rescue breaths take priority over equipment removal. If the victim is not responding at all and you are further than 5 minutes away from the boat or shore, you may choose to stop giving rescue breaths in favor of speed.
As soon as the victim is on a boat or on the shore you can perform a primary assessment and start CPR if necessary.
When performing CPR the ratio of compressions to breaths is 30:2. The rate of compressions should be 100 per minute.
A suspected victim of DCI should lay down and should breathe oxygen. It is preferred to administer oxygen through a demand valve. This can deliver close to 100% oxygen. If the victim has difficulty breathing you can switch to a nonrebreather mask. A pocket mask can be used if the victim is not breathing and rescue breaths need to be provided.
Monitor the patient and prepare for transport to the nearest medical facility. Always take the patient to the nearest medical facility, not the nearest recompression chamber. The reason for this is that the patient needs medical care as well as recompression.
Never put a DCI victim back in the water for recompression. Underwater, nitrogen elimination will be limited (because of the increased pressure) and it is very difficult, if not impossible to monitor the patient and to provide medical care.
Marine life injuries
Marine life injuries can vary from itching or stinging and pain to respiratory arrest and cardiac arrest.
With jellyfish and coral stings apply vinegar.
Wash and disinfect any wound that has broken the skin. Remove tentacles with forceps or another tool. Do not try to remove tentacles with your fingers.
If vinigar is not available it is preferred to rinse the sting with seawater. You should not rinse a jellyfish sting with fresh water because fresh water can cause the nematocysts (the tiny stinging cells) on the jellyfish’s tentacles to release more venom.
With lionfish, scorpionfish and stonefish stings apply heat to the wound with hot (not boiling) water for at least 30-90 minutes; The heat will disintegrate the protein in the poison and stop it from spreading.